

We all see epic guitar players on Instagram playing really cool stuff.
And then we think…
Man! I wanna do that too!
Then you go grab your phone, prop it up with an unwanted Christmas present, record and…
It sounds rubbish!
All that hard work getting the perfect take, and it seems like it’s been recorded with a half-empty, cheese & onion Pringles tube.
So today I’ll be going over how to record yourself playing guitar for Instagram and any other social media you may want to post on.
I’ll cover the best way to set up audio, video and lighting, so you can start looking and sounding like a pro.
Let’s roll.
You’ll Need an Audio Interface to Record Audio
Audio is just as important as video when it comes to great quality videos.
Mainly because smartphone mics are just soooo bad when it comes to recording guitar stuff.
The difference between smartphone guitar audio and properly recorded audio is like comparing The Rock to a ping-pong ball. They’re the same on the inside but appear very different, you know?.
So for some great sounding audio, you’re gonna need an audio interface to plug your guitar into.
You can then hook this up with a Digital DAW (E.g. GarageBand) on your computer, hit record and go.
And for that, I personally recommend the Focusrite Scarlett Solo.

I actually have one of these, and use it to record all the audio on my blog.
So if you like what you hear, then you’ll love it too.
Plus, Focusrite are kind of the name when it comes to recording audio. And they’ve got over 15,000 amazing reviews on Amazon, so I ain’t the only happy customer.
There are also bigger versions with more inputs like the 2i2 and 4i4 which may be an option if you have a bigger budget.
Normally you’d also have to pay multiple hundreds of dollars, pounds, euros, imperial credits, chickens, whatever currency you use, to pay for a decent DAW to go with it.
But thankfully all Focusrite Interfaces come with Ableton Live Lite and Pro Tools First for completely free. They’re basically smaller versions of their renowned older brothers which still pack in a bunch of features.
I literally use a Focusrite Scarlett Solo with Ableton Live Lite on a day-to-day basis and can happily say I’ve never needed more.
Whatever floats your boat.
Connecting Headphones to Your Interface
As annoying as it is, you’ll need a different shapes jack to plug your headphones into the interface.
Look at the jack of your guitar cable, it’s that kind of jack you need.
But thankfully you can cheaply solve this by getting a jack adapter like this off Amazon.

Then you’ll be good to go if you want to use your existing headphones.
And if you want better quality down the line, you could always get yourself a pair of dedicated Audio-Technica Studio Headphones.

But if you want to just record yourself playing guitar for Instagram, just using an adapter should be fine as you won’t need to properly mix anything.
Actually Recording Your Guitar
Boom! Let’s imagine that you’ve got the interface and headphones ready to go now.
And you want to actually record yourself playing guitar.
Well, there are two ways that you can do this:
- Record your guitar using a condenser mic
- Directly plug your guitar into the interface
Both ways are as effective as each other, it just depends on your situation.
So let’s look at using a mic first.
1. Recording Your Guitar With A Mic
Recording using a mic is best for when you play an acoustic/classical guitar.
And it’s also the best option if you don’t have many pedals and get most of the sound effects from your amp.
You just stick it in front of your amp or acoustic guitar, and it captures the exact sound that comes out. As easy as that.
*BEWARE: Condenser mics run on something called “Phantom Power”.
That basically means you need to power your mic by pressing the “48V” button on your interface once it’s plugged in. Otherwise, it won’t work.
You’ll often see these called vocal mics too.
And no, that does not mean you need to sing your guitar part into the mic… Actually, go ahead. That would be kinda funny to watch lol.
But as long as the mic is a condenser mic (best for studio/recording) and not a dynamic mic (best for live gigs) then you can record guitar with it as well.
So here are my top picks for condenser mics:
Overall best condenser mic option: RODE NT1-A
Best value option: AKG P120
On a budget option: Marantz Professional MPM-1000
Positioning Your Mic Correctly
If recording using a mic is the option for you, then you’ll need to make sure that it’s positioned in the right place to get the best sound.
For electric guitar, you’ll want to place it in front of your amp – using a mic stand ideally – like this:

Or you could use a pile of derelict books you haven’t read in a millennia to prop it up:

And there’s also the rather ingenuous way of dangling the mic from above:

Although, I don’t know how enjoyable this would be for the cable.
But you know what, if you wanna try it then knock yourself out. I ain’t gonna call the police on ya, I promise…
The main thing you’ll really want to experiment with, is the mic position in relation to the speaker.
Closer to the centre of the speaker = more highs, closer to the rim = more lows.
Normally a good halfway point between the speaker rim and centre works well.
And for acoustic guitar, a mic stand is probably going to be a must.
It’s best to position your mic about 15-30 cm (6-12 inches) a way from the 12th fret of your guitar.
Like this:

This’ll give you a nice balanced sound, with the sound being not too full of the lows from the sound hole or too thin from the mic being miles away.
But this is obviously just a guideline, so have a play around and see what takes your fancy.
2. Plugging In Your Guitar Directly
This is the number one winner if you want to record yourself playing guitar quietly and on the go.
But the catch is that you’re bypassing the amp, so you’ll need to make all your tones using pedals.
And this is fine if you’ve already got an expansive pedal board, an FX Processor like a Kemper, a BOSS GT-100 or an Amp Simulator.
You literally just plug in from the cable that would normally go to the amp into the interface instead, and you’re ready to rock.
But if you don’t then there is some seriously great Amp Simulator software out there which can help you get ultra-realistic tones for your guitar at a great price.
AmpliTube is one of the best, and has a free version that you can use to test everything out.
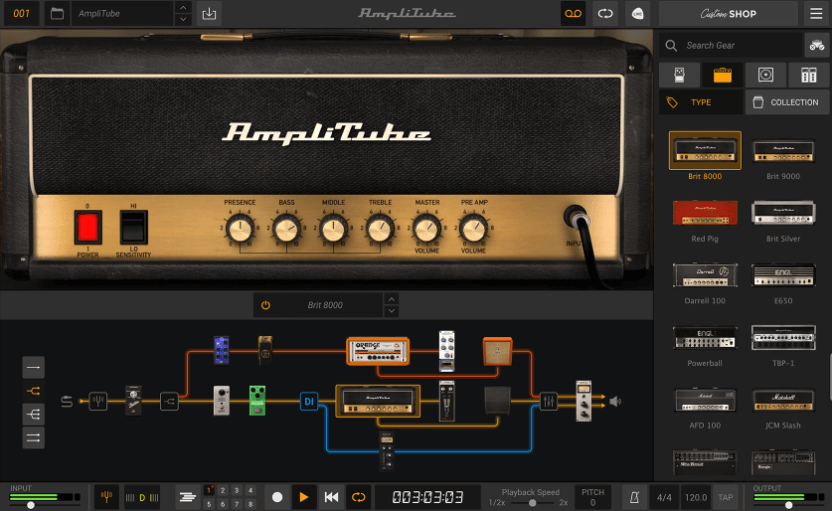
Here’s a great video explaining how to get your PC set up with an Amp Simulator if that sounds good to you:

Once you’ve plugged in your FX processors, pedals or loaded your Amp Simulator, you should be able to hear the amp/pedal tones out of your headphones clear as day.
Then you can record all day long to your heart’s content and the only person hearing it will be you.
Tips for Recording Audio Before We Look At Video
When recording audio, it’s very important to set the right amount of gain.
On your interface there will be a “Gain” dial which you can use to adjust this.
If the gain is too high, you’ll hear lots of breakup in the recording, and the track will look like this:

If the gain is too low, the track will be very quiet for listeners and will look like this:

So all you need to do is decrease the gain using the dial until you get a happy medium:

The light around the gain dial tends to flash green when you have enough gain, and amber and red when there’s too much.
And if you have to turn your gain all the way down to stop the breakup, then consider turning the gain down on your amp/FX instead.
“No pain, no gain” – Sam Olverson, sometime in the 21st century AD.
My second tip is a quick one about how to export your audio when you’ve finished recording.
Make sure you’ve got your track in front of you on your DAW that you’re using first. (For me, that’s Ableton)
Scroll to the end of the track and notice what bar it finishes on:

And then click on “File”, and scroll down to “Export” and click that too.

You’ll see numerous options come up, which will differ depending on the software you are using.
Make sure that the “Render start” is set to bar 1, and that the “Render length” is set to whatever the finishing bar was from earlier – in this case, Bar 51.
You’ll also notice an option to select “Render resolution”.
I recommend selecting “44000” for Instagram videos since you can’t hear the difference between that and higher resolutions on a zero-sound-quality phone speaker.

It also prevents the file getting too large, which speeds up the process of editing the video later.
Click export, save it somewhere with the rest of your soon-to-be tracks, and you’re done.
And as long as you can do all that, you’ve got the audio side covered!
So now let’s look at recording some sweet, sweet video…
Is Recording With Your Smartphone Good Enough?
To answer this in one word…
Yes it definitely is.
As long your phone isn’t a throwback to the Jurassic era, and has a decent enough camera (no Nokia Bricks soz) then you should be fine.
If you have a recent phone and your videos still come out looking meh, it’s more often that not to do with the lighting.
At the moment you’ll either have:
Dark lighting = bad
Yellow lighting = grotesque
No lighting = like, what?
We’ll get to fixing that in a minute.
But if you have a massive urge to shell out on an expensive camera to record yourself playing guitar with for background blur and stuff like that, then go for it.
The best cameras like the Sony Alpha 7 III tend to be around $2000 and even good lower end Canon models are around £350/$500.

So that’s not gonna be an option for most people.
And you’ll still need good lighting and a decent camera angle for any kind of camera to work properly.
Plus, the difference between 4K and 1080p on a phone on Instagram will be negligible. I mean, most people – unless you’re a gaming wizard – don’t even have phones or laptops that support 4K.
The moral of the story is that you can make your phone camera look more than good enough with some effective lighting.
So let’s fix that!
How to Set Up Lighting For Great Videos
I must have hyped y’all up for this one now, so buckle up…
Fixing your lighting will make a huge difference to your videos, and getting an LED soft light is what you’ll need.

This’ll give you the ability to properly light up your videos and get rid of graininess, yellowness and outright darkness that makes it look like you record yourself playing guitar on a smartphone.
In a perfect world, you’d have a light either side of the camera you are filming with, with both pointing towards you.
And maybe even a light in the background behind to add some warmth or colour.
All in all, that setup would look a bit like this:

Scrumptious.
But it’s also alright to use just a single light just above the camera when starting out, like this:

You’ll still have more than enough lighting that way and can definitely record some great videos.
Plus, you could always get some coloured LED strip lights or a second LED light later down the line for a bit more luxury if you wanted.
Overall best LED soft light: RALENO LED Video Lighting Kit
Best value LED soft light: RALENO LED Video Light I personally use this light, and it’s served me extremely well.
On a budget LED soft light: RALENO LED Camera Light
Yup, me gusta RALENO.
Just beware that the RALENO Video Light and Camera Light along with many other LED soft lights don’t come with stands.
So you may also want to consider getting a simple stand like this to make life easier for yourself. It’ll be compatible with phone clamps and LED soft lights alike.
Epic Tip: Once you’ve got your lights set up, make sure you close the blinds/curtains in the room you are filming in.
Natural light will muck up the perfect lighting angle you’ve spent years getting and everything will look more amateur.
Besides, you’ll have enough light from the LED to compensate for this anyway.
Choosing a Background
Choosing a background to record yourself playing guitar is always more fiddly than you think.
If you can find a relatively neutral coloured wall (white, grey etc.) in your house with no furniture in the way of it…
Then boom! You can use that as your background.
If you have a really cool array of guitars hung on the wall…
Then boom! You can use that as your background.
If you have an ultra-technical computer & recording setup that could hack into the Pentagon, launch nuclear missiles and end the world…
Yup, you know it! You can also use that as your background.
It honestly doesn’t really matter as long as the background looks relatively guitar related or simple/neutral.
People just don’t really want to see your bed, wardrobe or bathroom, you get me?
Otherwise, they’re gonna feel like they are in your bedroom, and it’ll all be a bit weird.
I mean, personal interaction is good and all, but errr… That’s a bit too much.
And if you don’t have anywhere appropriate which you can use in your home, then you could always get yourself a simple white screen.

How to Set Up A Good Camera Angle For Playing
If you want to record yourself playing guitar and look like a pro, then a solid camera angle is vital.
The camera angle you want to avoid at all costs is the infamous “Propped up against something angle”.
It’ll look very familiar when you see it:

Yuck.
So to avoid that at all costs, using a stand is the way.
An investment into a phone stand like this will make your videos look 10x better overnight.
And it’ll also allow you to put that pile of books you used to film stuff with back on the shelf.
Most of the time, the best camera angles are set level with or facing downwards slightly onto the guitar.
This is a great video by Music is Win which literally shows you the way that 25 different professional online guitarists record themselves.

Notice that the best camera angles are the ones which show both the guitar and the guitarist’s face in the video.
Take Paul Davids for example:

You’ll see many people use this camera angle throughout the video since it just works and looks great.
The only problem is that it isn’t quite as effective on Instagram since everything tends to be portrait rather than landscape.
And since guitar is an instrument that naturally fits landscape stuff, this is as annoying as someone spoiling Avengers Endgame the day after it comes out. There’s always one…
But that’s why on platforms like Instagram and TikTok, it’s totally okay to chop off some guitar either side of you and the part of the fretboard you’re playing.
Sophie Burrell is a great example of bringing this type of angle over to Instagram:

This is a great video because the lighting is good, the camera angle points slightly downwards onto the guitar and the background is nice and neutral.
What she’s playing can clearly be seen in the picture, and her face is clearly visible too.
And that’s so important for getting people to like and follow you on Instagram. It stops you becoming just another faceless Instagram guitarist to them, but someone to connect with.
Sitting down instead of standing up when you record yourself playing is a great advantage in this respect since you fit less torso and more face + guitar into the shot.
Multiple Camera Angles & Action Shots
You wanna really get things spicy?
Then using multiple camera angles to record yourself playing guitar is something wacky you can try out.
And there are two ways that you can do this.
The first way is to film yourself with the same camera, and take multiple videos of you playing the same riff/song/solo etc.
You might set up two phone stands in two different angles. Then you’d play the song twice through, once with the camera in one angle, and the second time with it in another angle.
After that, you’d edit them into each other so that the angles alternate at the end. (I’ll show you how to easily edit stuff later)
Relatively easy, and nice and cheap.
The second way is to use multiple different cameras and record the song once through, with all the cameras recording from their respective angles at the same time.
It’s a bit quicker and easier to record, but you’d have to pay for those extra cameras.
So with that in mind, a couple of shots that work great for recording guitar are:
- The Nut Shot – I could have called it The Headstock Shot, but where’s the fun in that?

If you’ve seen the feature image to literally any of my other blog posts then you will know that, err… I quite like this shot.
- The Bridge Shot

Cool if you’ve got some fast picking, hybrid picking or stumming going on.
- The Fretboard Shot

Not so common, but nice if you want to show off how your fingers move faster than everyone else’s and make them feel really bad about it for fun.
Still, wacky camera angles aren’t necessary and are more performance angles than anything else.
If you want to be instructive to your audience, then you might wanna give the next one a go instead…
Setting Up a Great Instructive Camera Angle
If you’re a warm-hearted fellow who deeply cares about your viewers being able to learn and progress from each piece of content you produce…
Cough cough hellooo???
Then you may want to make it really easy for them to see what you are playing.
So in this case, you’ll want to get your guitar up close to the camera to record yourself playing or vice versa.
It’s still a good idea to avoid the “propped-up phone” camera angle and so try to keep your phone at a similar angle and height as before.
It should look a bit like this:

That way, everything is nice and clear, and there is still space in the video to add a tab on screen for people to follow.
Perform to Make an Entertaining Video
When y’all start to record yourself playing guitar, dance around a bit, jump, wiggle your guitar, do a handstand with your guitar still on!
Just do something, I don’t care!
*Please do not actually attempt a handstand with your guitar on, it will not end well.
The point is that people often go to YouTube or Instagram or TikTok to be entertained.
The less statuesque and the more Hubba Bubba you are, the more likely people are to enjoy your videos.
The more likely they are to enjoy your videos, the more likely they are to follow you.
The more likely they are to follow you, the more likely you are to call the police to stop this random person following everywhere.
Just act like you are having fun and enjoying yourself with some charisma sprinkled in there too. And that ain’t too hard, right?
If you have no idea how to be entertaining, then watch a few of your favourite artists live.
What are the moves and actions they do on stage to keep things moving and entertain the audience?
Add a few of these in whilst you’re filming and the enjoyability factor will increase by a ton.
Recording Whilst Filming Vs. Miming
Fundamentally, there are two different ways that you can record the audio and video to yourself playing guitar.
The first one is to film yourself as you record the track.
And the second one is to record the track, then record yourself pretending to play it later.
Both work but both have certain advantages and disadvantages.
If you record whilst you film, it’ll look and feel more authentic and believable than a mimed track.
However, it’ll take much longer to get the perfect take since you have to get both the video performance and the audio track spot-on at the same time.
That’s why recording both at the same time tends to work great for shorter clips.
But if you “Mime” the guitar part, you can put on a bit more of a show, record different camera angles, and not worry about what your playing becoming messy as you do it. It’s not being recorded after all.
And if you do it well, then people will think that you are recording it as you play anyway.
The only problem is that everything will look very odd if the guitar part doesn’t match up perfectly with the audio.
And getting stuff like vibrato looking right when miming is very difficult too.
But at the end of the day, basically every music video ever is mimed, so it ain’t that difficult to do well.
Have a go at both and see which style you prefer.
How to Transfer Video/Audio Between Your iPhone + PC
Alright, so you’ve got your epic audio and video recorded.
But when you’re making a video, you’ll probably be recording the video on a smartphone/camera, and the audio on your laptop.
So let’s take a look at getting them onto the same device so that you can edit them together.
We’ll get onto how to do to this on Android in a minute.
With an iPhone and MacBook, using AirDrop is probably the fastest and most efficient way to do this.
I recommend watching the video below for a step-by-step tutorial of how to send files from your Mac to your iPhone.
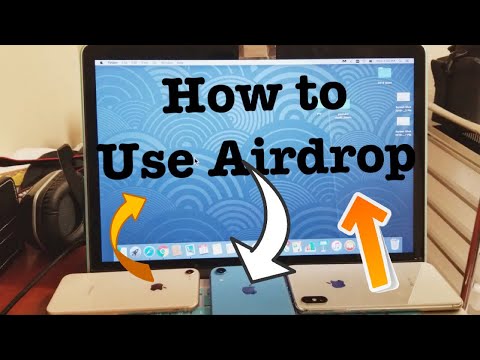
There are a few fiddly bits to it which it’s better to just see, and the guy above explains everything clearly.
You could also set up Wi-Fi syncing, which is something I’ve never tried but could work for you. Apple has a dedicated article on that here.
Or you could do it the old-fashioned way:
- Hook up your iPhone to the computer with a USB
- Load up iTunes
- Look for the iPhone icon in the top left of the window
- Click “File Sharing”
- Click “Add” next to the file you want to send to your phone
- BOOM! You’re ready to go.
And if I’ve left you banging your head against the desk in confuzzlement, then Apple has an article on using USB to transfer files here if that helps.
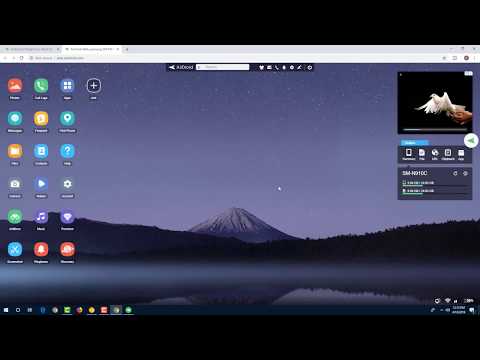
How to Transfer Audio Between Your Android Phone + PC
Although it’s not quite so seamless as transferring from Apple to Apple, it’s still easy to do between Android phones and PCs.
The first method – which is the one that I personally use – is to download an app called AirDroid on your phone, as well as on your computer.
From there, it’s as simple as loading up AirDroid on both devices, signing in to your account on both, and selecting whichever file you want to share across.
It’ll then quickly pop up on the other device. Bish bash bosh, as easy as that.
It’s not difficult, but for a more comprehensive tutorial, then here’s a great video on setting it up from scratch.
The second way is to use an app like ShareMe to sent files over Wi-Fi to the other device.
I’ve never personally used this one, but it’s really popular may be a great option for you.
Here’s a video showing you step-by-step how to set up ShareMe Wi-Fi transfer.

And the third way, the same as always, is to use a USB connection.
Here’s what you want to do:
- Use a USB cable like the one you charge your phone with, and plug it into your laptop and your phone.
- If an error message comes up on your PC, then go to your phone settings. Click on “Blutooth & device connection” and scroll down to the USB section. From there, click on the USB logo, and it should bring up your USB preferences. Click on “File Transfer” and you’ll be good to go.
- Open File Explorer and find your device in the “This PC” section.
- Click on your device, and you’ll see a bunch of folders and stuff. Congrats! You’ve just found your phone storage.
- Then create a new folder for Audio Recordings, and drag across any exported audio you want to get onto your phone, into this folder.
There’s also a great video on how to do this here if you are unsure.
And BAM! You’re done. Pretty easy, right? Meh, not really. But it works, and you’ll soon get the hang of it.
How to Edit Your Recorded Audio and Video
Whoop! Whoop! You’ve now got through the hard part.
So let’s get to the fun part! Sort of…
Make sure you’ve exported and transferred the audio across to your phone using the steps we’ve previously gone through.
And from there, I recommend using a really nifty video editing app for your phone, called InShot – Video Editor.
It’s absolutely packed full of features, completely free to download, and available on both IOS and Android.
Once loaded up, it’s as simple as selecting the video you want to use and clicking on “Music” to import your audio.
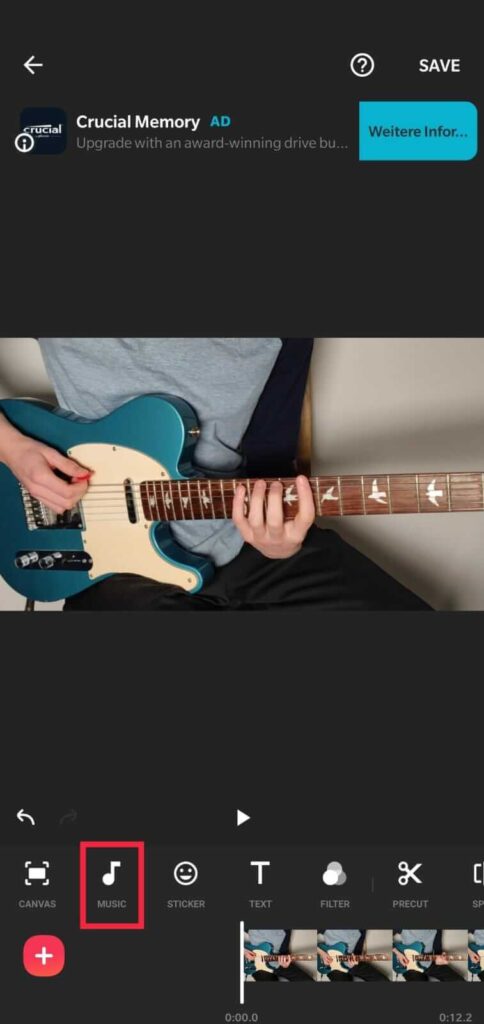

From there, you can adjust the video to whatever aspect ratio you want and even add text or a logo/name sticker to the video if you wanted, too.
Make sure you place and cut the audio so that it’s sync with the video and watch it back, just to check everything looks good.
Then hit “Save”. After that, you’re ready to head over to Instagram, select the saved video from your gallery, add a caption and some hashtags, then post.
And just like that, you’ve posted the first video of you playing guitar!
There’s always options like Adobe Premiere Pro if you wanted to use a computer editor, but that costs a lot and is confusing. Free computer editing software options also include Lightworks and Shotcut, but I’ve tried these both before and not had much success.
InShot literally has all the video features you could want anyway, accessible for free.
Wrapping it Up
Phew… That was a whopper of a post.
I feel like my fingers have hammered the keys on my computer so many times that they are slowly shrinking, turning into mangled stumps and my life is becoming a shad-…
Anyway, hopefully by now you’ve released your video to the world and have become the coolest person in town.
It may not go viral straight away but if you post consistently and regularly for a long period of time, you’ll start to see some results.
The key is patience, young one… Patience.
And if your account does somehow blow up, then Psst… you know who to thank for it 😉
I’ve been Sam Olverson,
See you in the next one!
P.S. If you want to learn how to shred on electric guitar for beginners so that you can record more impressive videos, then click here to view my post on that.


Thank you so much for this!!! I didn’t know how to do this with playing piano and this answered most questions for me to get started!!
No worries! I hope you can record some awesome videos now 🙂